Monday, July 30, 2012

Southeast Meets Western Frontier: Apple Dumplings

Southeast Meets Western Frontier:  Apple Dumplings.  Just like any other red-blooded American, I LOVE apple pie; therefore, Ree's Apple Dumplings recipe caught my eye immediately. 

Step One:  SHOP
My Ingredients.
I used the following ingredients:

  • 2 apples
  • 3 peaches
  • 2 lemons
  • 1 stick of butter
  • 2 cups of flour
  • 2/3 cup of buttermilk
  • 6 tablespoons Agave Nectar
  • 2 tablespoons honey
  • 1.5 teaspoons vanilla extract
  • 12 oz Canada Dry club soda
  • Ground cinnamon to taste
  • Blue Bunny All Natural Frozen Yogurt to top

Step Two:  Peel Fruit

I'm in Georgia so I decided to also try peaches with this recipe.  I peeled 2 apples and 3 peaches and quartered each fruit.  If I were to repeat this, I would halve the fruit instead.  I found that the bread to fruit ratio was too high for my taste, and it slightly masked the delicious fresh fruit.   

Step Three:  Mix the Dough
Instead of using croissant dough from a can, I made my own dough.
I checked out the ingredients on a can of crescent roll dough (as described in the original recipe), and I decided to avoid preservatives and food dyes by whipping up my own dough.  In my magic food processor, I added 2 cups of self-rising flour (Southern Biscuit brand), 2/3 cup buttermilk and 4 tablespoons Agave Nectar. I turned on the food processor until I had a nice dough blob

Step Four:  Roll the Fruit Slices
Dough can be frustrating/sticky to work with so keep that extra flour handy.
If you've never worked with dough before, this is your warning:  It's sticky, and if you don't like that sort of thing, take a deep breath because you're in for a ride.  I fall into that category, and no one warned me.  I've overcome this kitchen quirk by setting out a cutting board (in this pic, it's one of the transparent flexible types), my blob of dough and some flour.  I then take a pinch of dough (with my hands), roll it between my palms and then flatten it into a nice little circle.  If it sticks to your fingers, just grab some of the dry flour; it's a life saver.  This can be used to wrap each fruit quarter/half. 

Step Five:  Arrange Dumplings in Baking Dish
Dumplings soaked in butter and lemon soda.
Place the wrapped dumplings into a baking dish, sprinkle with ground cinnamon and pour the melted stick of butter (original recipe calls for 2 sticks) over the dumplings.  To this, Ree then recommends pouring a 12 oz. can of Mountain Dew.  Again, I avoid high fructose corn syrup, food dyes and preservatives when possible so I combined the juice from two lemons, 12 oz. of Canada Dry club soda and 2 tablespoons of honey.  I'm in no way stating this is the best substitution for Mountain Dew BUT for my nutrition preferences, it worked. 

Step Six:  Bake
The finished product.
The original recipe baked at 350 degF for 40 min.  I found that with the juicy fresh peaches, however, it took an hour.  Basically, I would recommend checking the dumplings every 30 minutes to make sure they're being cooked adequately but not burned. 

Step Seven:  Enjoy! (...preferably with ice cream)
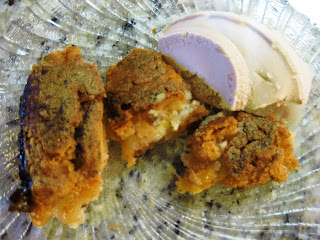
A la mode...
Yum!  I was excited to find the Blue Bunny all natural frozen yogurt options available.  The ingredients list was free of preservatives and food dyes so common to most frozen desserts.  I called two dumplings a serving, and as prepared, it made nine servings.  Servings are only dependent on how many dumplings you can fit in your baking dish. 

263 cal/ 41 g carbs/ 10 g fat/ 4 g protein per 2 dumplings

373 cal/ 60 g carbs/ 13 g fat/ 8 g protein per 2 dumplings and 0.5 cup frozen yogurt

**Notes**
  1. This freezes nicely.  Simply re-heat in the microwave and add a scoop of frozen yogurt. 
  2. I can't say that this has taken the place of apple pie in my book, but it is a fun treat with fresh fruit. 
     

Friday, July 27, 2012

Southeast Meets Western Frontier: Gazpacho

Southeast Meets Western Frontier Gazpacho.  Ree says this is one of her favorites, and I can see why!  I've never been a chilled soup fan (ever since I tried a yogurt chilled asparagus medley in high school), but this one is worth remembering.  

You'll notice I'm still struggling with posting images... so again, I appreciate your patience! 


Step One:  Beautiful shrimp

Wild caught $14.99/lb

The ingredients I used:
  • 1 lb of shrimp
  • 2 garlic cloves, minced
  • 1/2 medium red onion
  • 1 large cucumber
  • 1 zucchini
  • 2 celery stalks
  • 2 large red tomatoes
  • 1/2 a lemon
  • 1/4 cup extra-virgin olive oil
  • 2 tablespoons red wine vinegar
  • 2 teaspoons agave (in the place of 2 tablespoons sugar)
  • 5 dashes of hot sauce
  • sea salt and ground black pepper to taste
  • 4 cups low sodium V8 juice
  • 1 tablespoon dried cilantro
  • avocado slices

Step Two:  Season and Saute Shrimp

Saute shrimp with desired seasoning
I used a Caribbean Jerk Seasoning for my shrimp BUT you could use any seasoning for your shrimp and be successful.  I usually use a Cajun seasoning with my shrimp, and that would also complement this soup well.  Luckily, Gazpacho is so flavorful it will go well with most all seasoned shrimp. 
Step Three:  Food Processor Magic

Vegetables in, Soup out
I love my food processor.  The recipe calls for adding the onion, garlic, lemon and half the other vegetables in the food processor along with the olive oil, hot sauce, red wine and 2 cups of the V8 juice.  That's great, except- if your food processor leaks due to all the liquid!  So I would actually modify this so that the entire 4 cups of V8 juice were simply in a pot to which the food processor mixture was added. Stir.

Step Four:  Finish soup
More veggies
To the pot containing the V8 juice and food processor mixture, add the remaining half of the vegetables and stir.  It is immediately delicious! 

Step Five:  Soup toppings
Yummy Soup! 
I topped 1 cup of the soup with 3 shrimp and half an avocado, sliced (I apologize for low picture quality... have faith, I'm sure to improve).  This easily makes 8 servings with the following nutritional information:

104 calories/ 10 g carbs/ 7 g fat/ 2 g protein per serving (1 cup of just the Gazpacho)

265 calories/ 19 g carbs/ 22 g fat/ 4 g protein per serving with half an avocado, sliced

328 calories/ 19 g carbs/ 23 g fat/ 17 g protein per serving with avocado and shrimp

**Notes**
  1. Be careful- ALWAYS taste veggies before adding them.  For instance, the cucumber I bought was bitter when I tried to add it with peel, but once I peeled it, it tasted fine. 
  2. Your food processor may leak... lesson learned.
  3. I added 1/2 a lemon to this recipe to help it stay fresh longer... you know, in case all that salt from the V8 juice didn't work <sarcasm>. 
  4. I made this and stored it in the refrigerator for one week. 
  5. Woman's Day Magazine features a Tex-Mex Gazpacho this month that looks very good and is of a similar calorie count. 

Wednesday, July 25, 2012

Southeast Meets Western Frontier: Pasta with Pesto Cream Sauce

Welcome to my second blog of the Southeast Meets Western Frontier series:  "Pasta with Pesto Cream Sauce".  Please forgive my picture-taking learning curve... You'll notice the ingredients are a little topsy-turvy. 

I was super-excited about this recipe because I got to use my own basil plant.  Unfortunately, while plucking basil leaves, I dislodged a spider into the nearby Parmesan cheese bowl.  The Lesson:  gardening is an outdoor sport for me.  (And while this month's edition of Women's Health Magazine says 68% of women are OK killing spiders, I still prefer oblivion to the existence of spiders.)


My Ingredients.
I used the following ingredients:
  • 3/4 cup fresh Thai Basil leaves (I imagine all basil will be delicious)
  • 3/4 cup grated Parmesan cheese
  • 3 tablespoons pine nuts
  • 2 garlic cloves peeled
  • sea salt and ground black pepper to taste
  • 1/3 cup extra-virgin olive oil
  • 1/2 cup heavy cream (from Morning Fresh Dairy Farms)
  • 2 tablespoons butter (from Cabot Farms)
  • 12 ounces Ronzoni Healthy Harvest 100% Whole Grain Pasta
  • 2 large red tomatoes, diced
  • 1 lb of chicken tenderloins

Step One:  Start boiling water for your pasta. 

Step Two:  Food Processor Magic
The beautiful basil mixture... and tasty, too!
I combined the washed basil leaves, 1/2 a cup of Parmesan cheese, the pine nuts, peeled garlic cloves, sea salt and black pepper in my food processor.  While the food processor is running, slowly drizzle in the olive oil (if you have a small food processor without the opening, go ahead and add the oil along with the other ingredients).  This will make a pretty green mixture as shown above.

Step Three:  Creamy pesto sauce

The pesto sauce.
In a sauce pan, I heated the heavy cream and butter.  To that, I added the green pesto from above. I let this simmer for a 5 minutes and added the final 1/4 cup Parmesan cheese.  Stir. (and taste for the yum-effect!)

Step Four:  Combine the pasta and pesto

The final pasta salad.
The pasta should be cooked nicely by this step.  Drain the pasta, add to your serving bowl and cover with the pesto.  Stir this mixture and add the diced tomato (I prefer big veggie chunks but feel free to make your 'diced' tomatoes smaller if you like).   

Step Five:  Add protein

My protein addition- basil chicken tenderloins.
Finally, I cooked the chicken tenderloins in water and olive oil in a pan, seasoning with basil, sea salt and black pepper. 


Step Six:  Portions

This recipe feeds 8 people easily.  I called one serving a 1/2 cup of the pasta salad and one chicken tenderloin.  This yielded a serving of:

469 calories/ 37 g carbs/ 23 g fat/ 33 g protein per serving

Without the chicken tenderloin, the nutritional information is:

369 calories/ 37 g carbs/ 23 g fat/ 11 g protein per serving

**Notes**
  1. I stored this in the refrigerator for one week using it for lunch each day.
  2. I paired it with a big ruby red grapefruit each day. 
  3. The hardest part of this recipe was definitely showing self-control in tasting the creamy pesto sauce... and fighting spiders  ;) 

Monday, July 23, 2012

Southeast Meets Western Frontier: Make-Ahead Muffin Melts

Welcome to the beginning of a Southeast Meets Western Frontier series in which I'll attempt a number of recipes from the delicious portfolio published by the ever-talented Pioneer Woman- Ree Drummond.  I imagine I won't be able to wrangle my creativity to follow the recipes exactly as published, but I promise to disclose all acts of rebellion (including links to the original masterpieces) with apologies to their original creator. 

The Pioneer Woman Cooks:  Food from My Frontier by Ree Drummond is the primary source of my Southeast Meets Western Frontier series.  While I do not have the windows overlooking pasture like Ree, I do have a beautiful resident mascot in the kitchen... that would be Supreme Touch of Velvet (the American Saddlebred horse http://www.asha.net/ in the picture... just one more thing American dreams are made of).

This breakfast bunch of yum was an easy pick for me.  I generally eat breakfast when I first arrive at work (while checking email).  This recipe struck me as a mobile, freezable, low-cost and filling option.  I made a few changes for my particular diet restrictions/preferences/calories (it's such a complicated lifestyle adults live).  The original recipe can be found here: Make-Ahead Muffin Melts, and below, you'll find an amateur's rendition with modifications to get a yummy product of:

305 calories/16 g carbs/20 g fat/16 g protein per serving.

First step:  Shopping (...the goal being a balance between quality and price)

Ingredients I used.  (Minus the garlic powder, red onion and bell pepper)

The specific ingredients I used:
  • 21 slices Oscar Mayer Turkey Bacon w/ Sea Salt (Smoked Cured - Low Sodium)
    • originally called for 12 slices... but I voted for 21 slices instead ;)
  • 12 hard-boiled L & R Farms, Inc. eggs, peeled and chopped
  • 2 cups Great Value Finely Shredded Cheddar Cheese
  • 1 cup Duke's Mayonnaise Light
  • 1 tablespoon Ba-Tampte delicatessen style mustard
  • 1/2 teaspoon generic garlic powder
  • 5 dashes of French's Worcestershire sauce
  • 6 Nature's Own 100% Whole Wheat English Muffins
  • 1/2 red onion, chopped (~1 cup)
  • 1 cup red, green and/or yellow bell pepper chopped
  • Sea Salt and Chef's Black Pepper to taste

Second step:  Cooking

If you're dieting, this will be the hardest step because the aroma of frying bacon is VERY tempting.

These eggs peeled fairly quickly (a relief since there were 12 of them and I'm impatient).  I boiled them in a tablespoon of table salt and 6 cups of water for 20 minutes.  

The already smoked, cured bacon fried just as quickly.  The original recipe calls for chewy bacon, but I prefer extra crispy so I'd recommend frying to your individual palate's preference.  I used the remaining bacon grease to saute half a red onion chopped (~ 1 cup) and 1 cup of red, green and/or yellow bell pepper chopped. 

Third step:  Preparation

I prepared the spread ingredients in a mixing bowl after chopping and/or sauteing.

Once I had all the ingredients in the bowl, I added the garlic powder, delicatessen style mustard, mayonnaise, and salt and pepper for taste.   

Fourth step:  Baking

The mix makes heaping helpings for each muffin half so feel free to indulge.

I preheated the oven to broil and proceeded to add the spread to each muffin half.  After broiling on the bottom rack for 5 minutes, you get the yummy product below.

Fifth step:  Enjoy!

Yum!  Makes 12 servings (so basically 2 weeks of breakfast if you freeze). 
305 calories/16 g carbs/20 g fat/16 g protein per serving.

**Notes**
  1. The spread can be kept in the refrigerator to prepare fresh each morning.  I prepared all 12 at once, wrapped them in aluminum foil and stored them in the freezer until it was time for me to go to work.  Defrost for 4 minutes and broil in a toaster oven/oven for 4 minutes and enjoy! 
  2. These are filling... Trust me- I work out in the morning and even with heightened metabolism I can eat these at 7 A.M. and be tied-over until 11:30 A.M. for lunch.  A friend and I even tried these before a river floating trip; we ate them at 10:30 A.M. and made it until our next meal at 5:30 P.M. 
  3. If you leave these tasty morsels on broil a couple of minutes too long, you will set off the smoke alarm... trust me- 6am with your hair still in a towel is not a good response time for anyone.